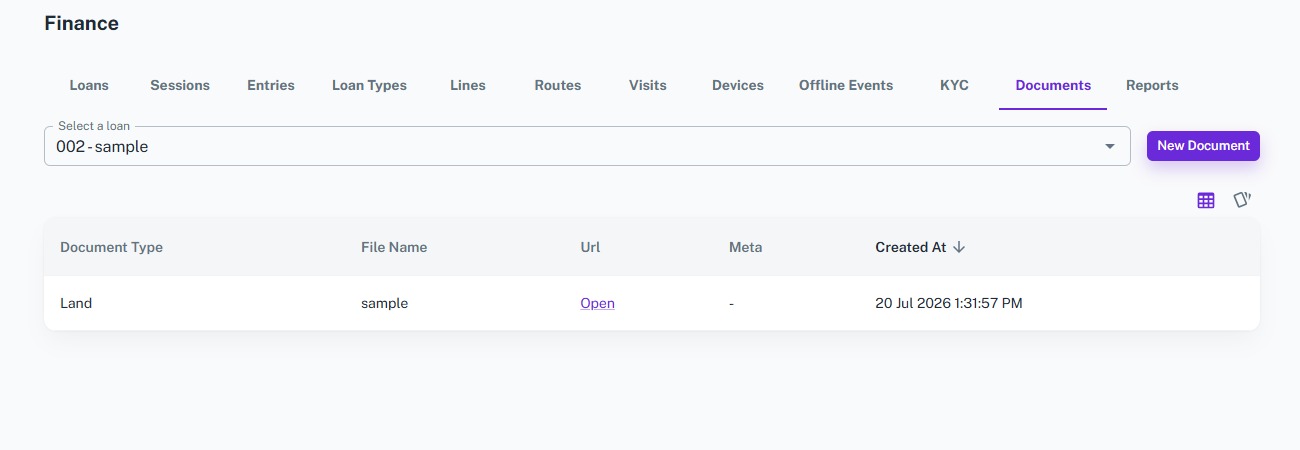
KYC
The KYC (Know Your Customer) Management module helps financial institutions securely store, verify, and manage customer identity documents. Upload customer KYC details, track document verification status, monitor expiry dates, and maintain complete compliance records from a centralized dashboard.
Key Highlights of KYC Management
1. Store Customer KYC
Record customer identity documents by selecting the customer, document type, document number, issue date, expiry date, and document file.
2. Multiple Document Types
Manage various identity documents such as Aadhaar Card, PAN Card, Passport, Driving License, Voter ID, and more.
3. Verification Tracking
Track the verification status of every document to ensure customer records are complete and compliant.
4. Expiry Monitoring
Maintain issue and expiry dates for documents and easily identify documents that require renewal.
5. Centralized KYC Dashboard
View, search, filter, and manage all customer KYC records from a single dashboard.
Create KYC
Overview
Add and manage customer KYC documents by recording document details and uploading supporting files. The system securely stores all customer verification records for future reference.
Key Highlights
- Add customer KYC records
- Select document type
- Record document number
- Track issue and expiry dates
- Upload document files
- Manage verification status
How It Works
- Select the Customer.
- Choose the Document Type.
- Enter the Document Number.
- Select the Issue Date and Expiry Date.
- Upload the document file or provide the document URL.
- Click Create to save the KYC record.
Workflow
The administrator selects a customer, enters the document details, uploads the supporting document, and saves the KYC record. The system securely stores the document and makes it available for verification and future reference.
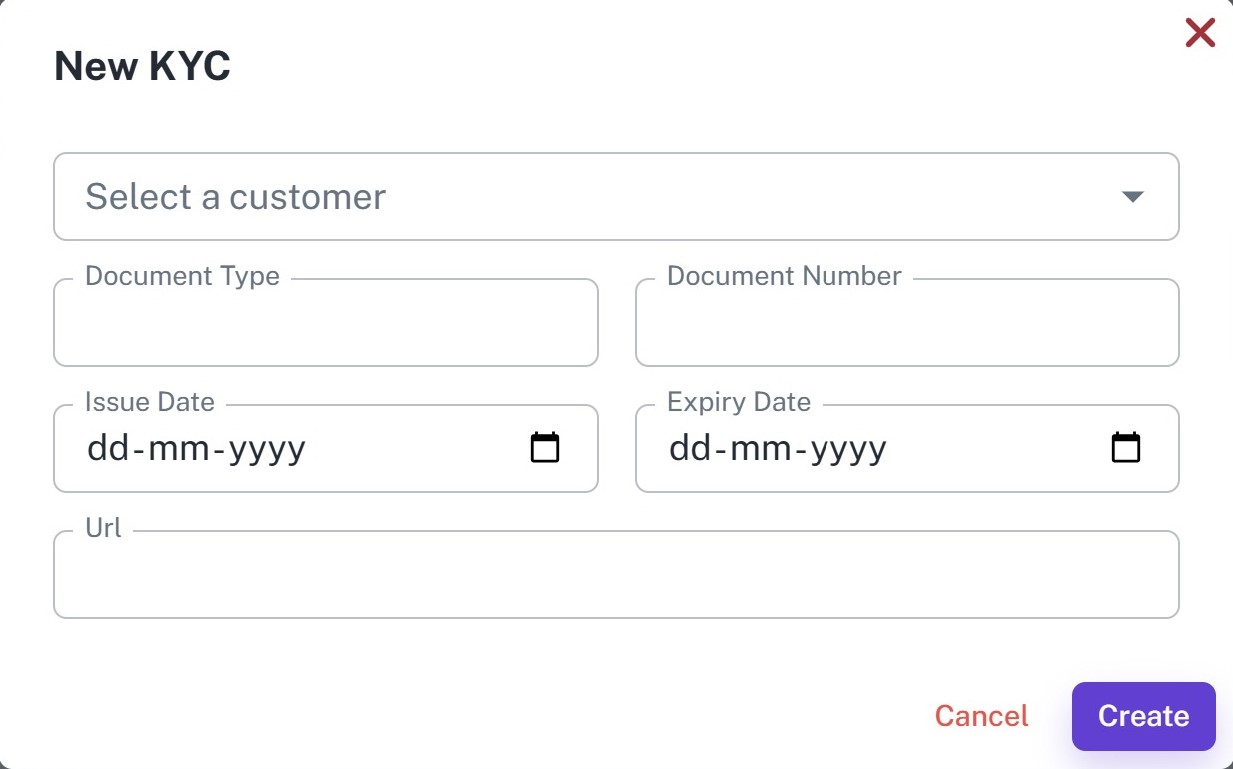
KYC List
Overview
Manage all customer KYC records from a centralized dashboard. View document details, monitor verification status, track expiry dates, and access uploaded documents whenever required.
Key Highlights
- View all customer KYC records
- Search by customer or document type
- Filter by verification status
- Track issue and expiry dates
- Access uploaded documents
- Manage verification records
How It Works
- Open the KYC Dashboard.
- Search by customer or document type.
- Filter records by verification status.
- Review document details and expiry dates.
- Open uploaded documents for verification.
Workflow
Managers and administrators use the KYC Dashboard to monitor customer verification records, review document details, verify uploaded documents, and ensure customer information remains complete and compliant.
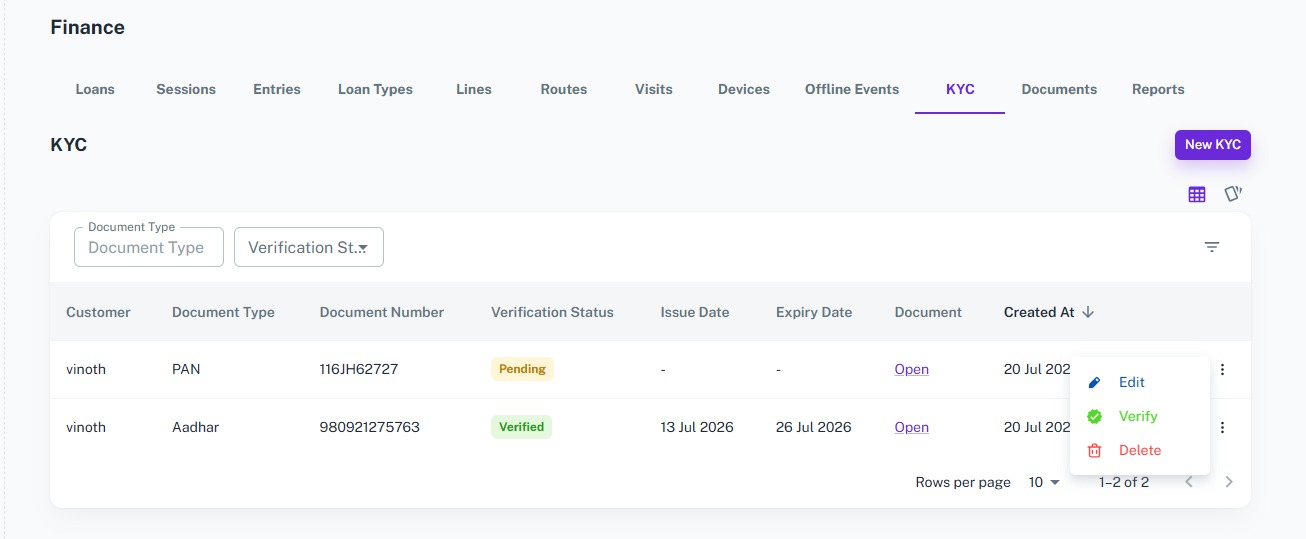
Documents
The Documents module helps financial institutions securely store and manage documents related to each loan. Select a loan, upload supporting documents, and maintain a centralized repository for easy access, verification, and future reference throughout the loan lifecycle.
Key Highlights of Documents
1. Loan-Based Document Storage
Upload and organize documents by selecting the corresponding loan.
2. Multiple Document Types
Store various loan-related documents such as agreements, identity proofs, collateral documents, property papers, invoices, and more.
3. Secure Document Repository
Maintain all loan documents in a centralized and secure location for easy retrieval.
4. Quick Document Access
Open and view uploaded documents directly from the document list whenever required.
5. Complete Document History
Keep a complete record of all uploaded documents along with file names, document types, metadata, and upload dates.
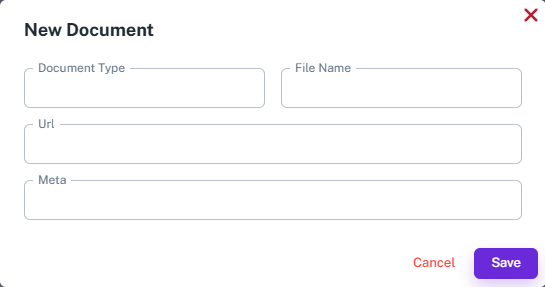
Upload Document
Overview
Upload supporting documents for a selected loan to maintain complete loan records. Every uploaded document is linked to the corresponding loan, making it easy to access and manage throughout the loan lifecycle.
Key Highlights
- Select a loan
- Upload loan documents
- Specify document type
- Store file information
- Add document metadata
- Maintain document history
How It Works
- Select the Loan.
- Enter the Document Type.
- Enter the File Name.
- Upload or provide the Document URL.
- Add metadata if required.
- Click Save to upload the document.
Workflow
The administrator selects a loan and uploads the required supporting documents by specifying the document type, file details, and metadata. Once uploaded, the document is securely linked to the selected loan and becomes available for future reference.
Documents List
Overview
View and manage all documents uploaded for a selected loan from a centralized dashboard. Easily access document details, open uploaded files, and maintain complete documentation for every loan.
Key Highlights
- View all loan documents
- Select a loan to view documents
- Open uploaded documents
- View document type and file name
- Access document metadata
How It Works
- Select a Loan.
- View all documents linked to the selected loan.
- Review document details.
- Open uploaded documents when required.
- Manage the document repository for future reference.
Workflow
Managers and administrators select a loan to view all associated documents. The document list provides quick access to uploaded files, document details, metadata, and upload history, ensuring every loan has complete and organized documentation.